Implementing Google Consent Mode v2: A Comprehensive Guide for Digital Marketers
19 March 2024
Service
Digital
Sub Sector
We live in the era of digital privacy. That is, a time when it’s valued above all else. With that in mind, adhering to Google’s EU User Consent Policy and GDPR is not just a regulatory requirement but a crucial aspect of maintaining user trust. The recent update to Google Consent Mode (specifically Consent Mode v2) demands attention from website owners and digital marketers. Are you paying attention?
The deadline is set for March 6th 2024. It’s vital to understand and implement this update efficiently. This guide aims to simplify the process of setting up Google Consent Mode v2 via Google Tag Manager, ensuring your digital marketing strategies remain compliant – and as effective as they can be.

What is Google Consent Mode v2?
Consent Mode v2 is Google’s solution for balancing the need for data-driven insights from tools like Google Analytics and Google Ads, whilst still respecting user privacy. This advanced version enhances the way consent signals are handled, offering more control over the data collected based on user preferences.
Why Choose a Consent Management Platform (CMP)?
Implementing Consent Mode v2 requires a CMP. While it’s possible to build a custom CMP solution, opting for a certified CMP like CookieYes’s CMP streamlines the process. These platforms not only provide the necessary infrastructure to manage consent but also offer pre-built tag templates for Google Tag Manager (GTM), eliminating the need for custom coding. A simplified process.
You can find a list of certified CMP partners that Google trusts here.
Our Step-by-Step Guide to Implementing Consent Mode v2 via GTM
Step 1: Acquire a CMP Account
Before diving into GTM, ensure you have an account with a Google-certified CMP. You can often start with a free trial to evaluate the service.
Step 2: Set Up the Tag Manager Template
Log into your Google Tag Manager account.
In the current workspace section click tags > new.
Name the tag appropriately, like “Consent Mode v2”.
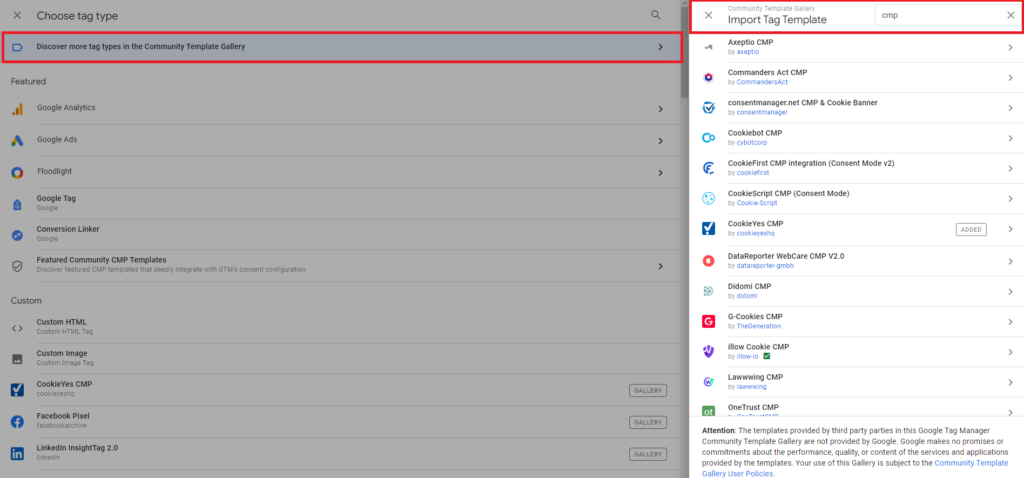
Go to the community template gallery under tag configuration and search for your chosen CMP.
Add the template to your workspace.
Step 3: Configure Your Tag Settings
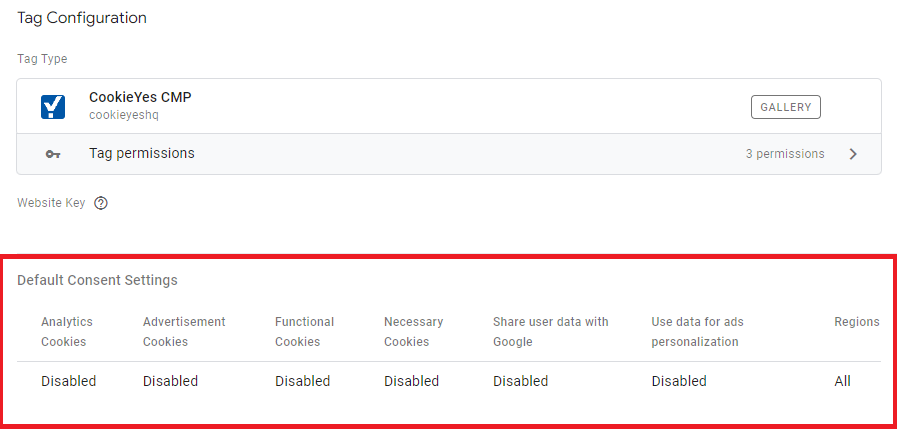
In “Default Settings”, add and adjust settings for each consent type (e.g. marketing cookies, analytics cookies etc.).
By default, all consent types are set to “denied” until the user gives consent.
You can modify these settings and add geographical regions to tailor the consent experience based on varying privacy regulations.
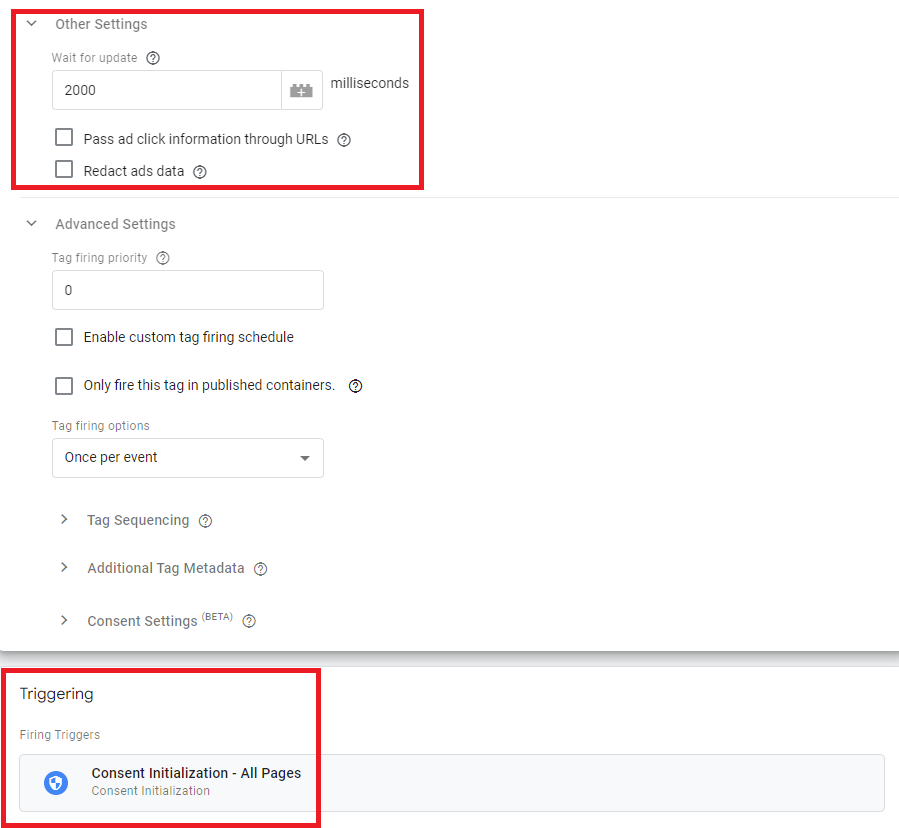
Step 4: Advanced Settings and Tag Firing Time Frame
In “Advanced Settings”, you can choose how long it takes for the tags to fire after the user has accepted the cookies.
Choose “Consent Initialization” as the triggering type.
Once configured, save your changes and preview your site. Previewing your site allows you to check if tags are firing before you publish any changes. You want to make sure any tags that have the cookie consent policy on there are firing only if a user accepts the cookies, and if a user does not accept the cookies the tags should not fire. When previewing your site your cookie policy banner may not appear. This is because you have previously accepted the cookies from the site.
To get the cookie policy banner to appear you have to access your google account settings in the top right, followed by Privacy and security > Third Party cookies > See all site data and permissions. You can then search for the site you are working on and delete the cookies. When you now load up your site in preview mode the cookie banner will appear so you can properly test your tags.
If all the tags you have worked on are working properly you submit your tag and publish the new tags. When publishing it’s important to check the “Publish to Environment” is set to live as this will make sure the changes are made to your site.
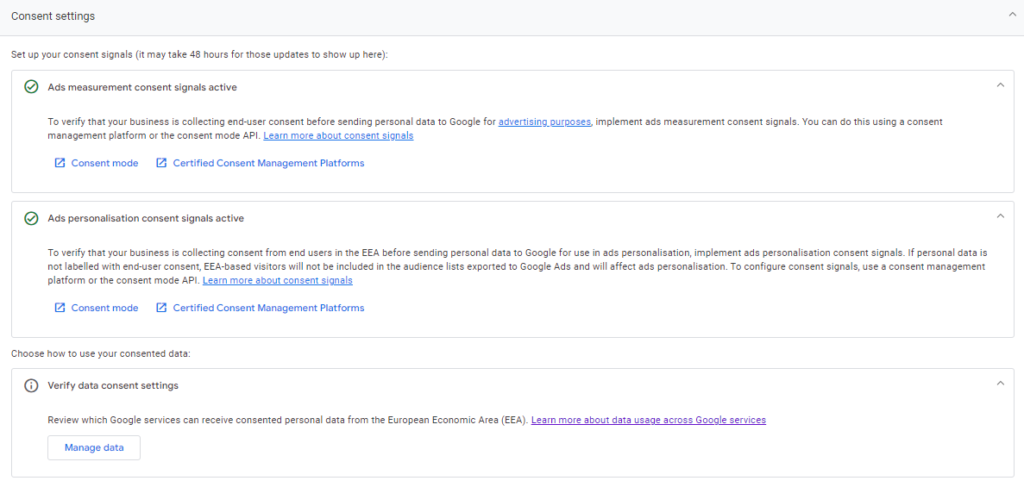
Step 5: Verify your set up
Your chosen CMS may have a verification system in place however it is possible to check it has worked.
Choose your GA4 account > Admin > Data Streams > Consent Settings.
You should see green ticks next to each setting which confirms it has been set up properly, if you do not see the green ticks it may be your cookie consent solution has not been set up properly or GA4 requires 48 hours to show the changes.
The Role of the Cookie Banner
Implementing Consent Mode v2 via GTM also includes setting up the cookie banner directly within GTM. Ensure you choose the correct banner template offered by your CMP. This integration ensures a seamless user experience and compliance with consent requirements.

Conclusion
Compliance with Google’s updated Consent Mode is not just about adhering to regulations, it’s about respecting user privacy and making informed choices about data collection. By following these steps and utilising a certified CMP, you can ensure your website is both compliant and optimised for your digital marketing needs.
Remember, the integration of Consent Mode v2 is a key aspect of modern digital marketing strategies, particularly for those focused on paid media and user experience. It’s crucial to stay ahead of these changes and implement them effectively to maintain both legal compliance and user trust.